How to do levitation photography
- Hayley Roberts
- Apr 6, 2015
- 6 min read
Updated: Nov 19, 2023

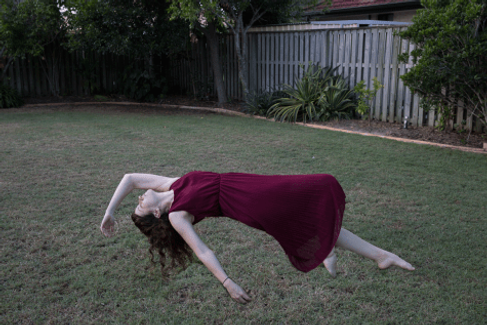
I was up in the air about how to start this blog post but then I realised that’s a terrible joke and decided to get on with it. The easiest and most effective trick you can do with photography and a touch of Photoshop magic is to make someone levitate, float or fly. Photos that defy gravity are both graceful and clever and look much harder to create than they actually are. My favourite levitation photographer is Natsumi Hayashi whose work is so simple, yet so unique and inspired.
How to take a levitation photograph
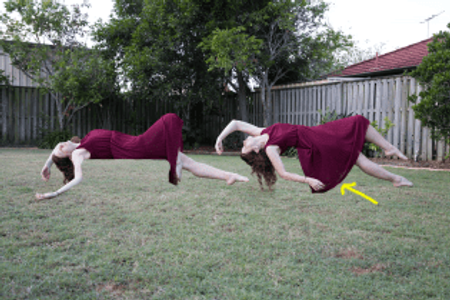
There’s two ways to try levitation photography – one requires Photoshop and the other does not. To make the kind of levitation image popularised by Natsumi Hayashi you simply need to photograph someone jumping. Selecting a high shutter speed of 1/500 or faster to freeze motion is preferable for that hovering appearance. This method gives built-in hair movement but all that jumping in awkward poses can be fairly exhausting on the body while trying to get it right.

Jumping example
The second method involves taking two photos and combining them in Photoshop. The first photo should be of your model perched on something, while the second photo should be the blank scene with the model and stand removed. Then all you need do is layer them together in Photoshop and mask (erase) the chair/table out of the scene so the blank background shows through.
To recap on lessons in previous weeks, here’s how to set up your camera:
Place your camera on a tripod or resting on something stable and compose your scene. This is important because your shots need to match up exactly for this to work seamlessly.
Switch your camera to manual and set your exposure. You don’t want ANY of your camera settings changing while you do this process or your photos won’t match up afterwards. You can also choose a white balance preset if you’re outdoors and worried about the light changing quickly but it’s not necessary.
Focus on your subject and then lock your focus by either switching your lens to manual focus or use back button focusing and don’t touch your focus button again.
You will need a remote if you’re shooting yourself (remember to change your camera to the timer). Although a remote is great even if you are shooting a model because it also allows you to assist the model with their posing without being stuck behind the camera.
Photograph your subject standing / lying / leaning on some kind of stand ie. stool (one that doesn’t swivel for god’s sake!) or table.
Not strictly necessary but if you want to make your levitation more interesting and believable you can photograph hair flicks, fabric flicks and limb movements separately and composite them together in Photoshop later. If you’re going to attempt this I really suggest sketching your image and writing down all the shots you’ll need to take so you don’t forget anything. It’s best for your subject to continue to hold their position while this is happening so the background is still the same.
Remove the subject and stand and photograph your blank scene.
How to make levitation look convincing
Try and shoot from the subject’s height or below. This will exaggerate the height of the levitation. Shooting from above compresses the distance between the subject and the ground and the levitation is less effective.
Don’t shoot from too low though or the stand that your subject is resting on will obscure part of their body and look unnatural when you Photoshop it out. Always get your subject to position themselves right at the edge of their stand, closest to camera.
Assess your light. If shooting in harsh light that is creating shadows you’re likely going to have to recreate these shadows in Photoshop under your subject once the stand is removed. To avoid this, aim for soft natural light such as an overcast day.
Where your subject is touching their stand will end up being flat which looks unnatural. You can avoid this by getting the subject to, for example, arch their back or by lying on a stool rather than a table so they can curve their body around the edges. This is why subjects wearing dresses are great so that you can drape some of their dress in front of the stand to disguise this problem. Just make sure the fabric of the dress is not too translucent or you will see the stand behind it which could be difficult to remove later. If all else fails, you can try selecting and liquefying this part of their body in Photoshop.
If using hair flicks to signify motion you should be including clothes flicks too to keep the idea of weightlessness consistent. If not, then you should ideally continue to follow the rules of gravity with the clothes / hair falling downwards. But of course, all this is dependent on your final story and intention.
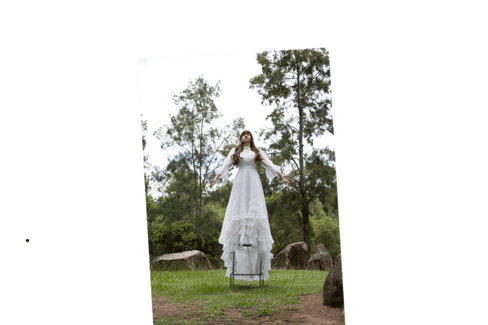
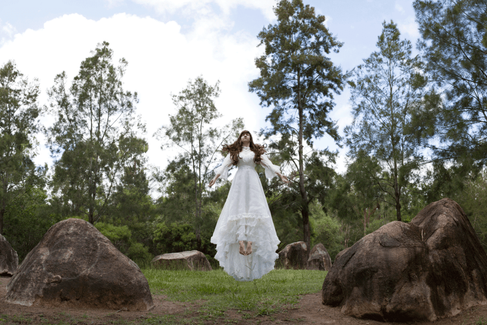
My image, The Rise, was taken on an overcast day down the end of my street where there’s a stone circle. Stone circles are steeped in mythology so I thought it would be a great place to make someone levitate. I’d also recently watched Picnic at Hanging Rock and having tracked down a wedding dress reminiscent of that fashion (thanks eBay) I thought it would be a great outfit for the location. I photographed myself posing on a tall stool then I shot some hair flicks. Next I shot my pointed feet separately to fix the problem of ‘flatness’ I mentioned earlier, then I took off the dress and held it up from the same height as I was standing. I did this because, since the back of the dress is so long, I knew parts of it were being obscured by the stool I was standing on, which would cause problems later when I went to Photoshop out the stool. I then took my blank shot and expanded my frame by taking shots all around. Making an initial sketch of all this was vital so I could see the areas I’d need to problem solve.
How to edit a levitation photo
Open your chosen images as layers into a Photoshop document making sure your blank layer is your bottom layer. Add a white-filled layer mask to your subject layer and, making sure the mask is selected, use a soft black brush to erase the stand from the photo, revealing the blank layer below. If you mess up and erase too much, switch to a white brush (x) to paint areas back in. You’ll find yourself toggling between adding and erasing a lot. Click here for more information about masking.
If you can view some of your stand through areas of translucent fabric try using a lower opacity brush to paint on these areas, or the clone stamp tool to remove the section entirely. If you’ve shot extra photos of hair, fabric and limbs for compositing you’ll need to either have some knowledge of selection tools to cut them out precisely (hair is it’s own particular beast) but if you’ve shot them on the same background you should be easily able to mask them in and have them line up without trouble. Make sure that when you are painting along edges that you switch to a brush with a hardness that matches the natural lines in the photo and be extra careful with your masking.
To add realism to your levitation you can add a shadow under your subject. I’ll talk about shadows more in future but just briefly you do this by first assessing the direction of light in your photo. Then create a new layer and using a soft black-filled brush paint a shadow under your subject roughly matching your subject’s shape in the area where their shadow would naturally fall. Shadows are darkest and sharpest where they are closest to the subject so you may need to create different layers of shadowing of varying darkness and hardness or change the opacity and hardness of your brush as you paint.
My image was a little tricky. The feet had to be cut out exactly and the back of the dress made to fit the main dress image. The hardest part was my hair. I got it to flick nicely on the left hand side but for some reason, not the left. I also shot some of the hair flicks while I was wearing a different dress so the background was different. To fix this I had to use areas of hair from the left and flip them to the right so they fit. I then had to erase bits of the background using a mix of cloning and lower opacity. It’s still not perfect but you can sometimes get away without being exact.
And that’s it! Abracadabra. Up and away!


